Beau - Critical Role
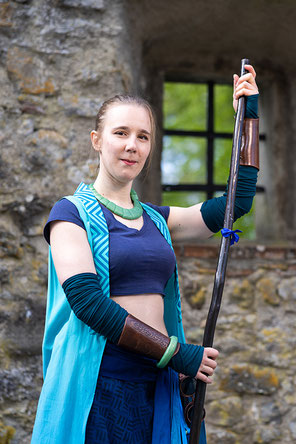

Nachdem ich im Suki-Cosplay mehrmals mit einem anderen Charakter verwechselt wurde, wollte ich ein neues Cosplay machen. An der Fantasy Basel hatte ich zu meiner Überraschung mehrere Critical Role Cosplayer angetroffen. Da ich die Show sehr mochte, beschloss ich, als nächstes Beau zu cosplayen. Der Charakter ist sehr athletisch und shaolin-mönch-ähnlich. Da war die Versuchung gross, denn ich praktiziere selber Kampfkunst und so würde mir mein Kungfu-Hintergrund helfen, den Charakter darzustellen. Es war auch keine Perücke oder Schminke nötig, also eine einfache Wahl.
Das Projekt war zum grössten Teil Näharbeit. Ich musste mir ein Schnittmuster ausdenken und lernte, wie man Stoffe in einem Farbverlauf färbt. Zusätzlich stellte ich einen Musterstempel her und bedruckte den Stoff der Hose. Für die jade-ähnlichen Accessoires kam dann Fimo zum Einsatz.
Beau trug ich deutlich häufiger als die vorangehenden Cosplay - das erste Mal an der Unicon Zug im Juli 2019. Einige Elemente passte ich im Laufe der Zeit an. Ich hatte enorm Glück und gewann in einer Lotterie ein Fotoshooting mit Thomas Kilcher - wo sich dann meine Überlegung bezüglich Kungfu durchaus auszahlte. Auf den Fotos das Cosplay festgehalten und gewürdigt zu sehen, fühlte sich sehr belohnend an für ein solch langes Projekt.


Project Description
Before Sewing

To Do List:
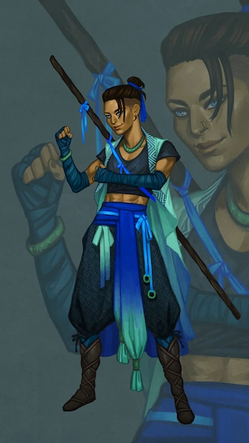
- Top (dark blue, short sleeves on shoulders, short)
- Coat (turqoise to dark blue, with a kimono-ish collar)
- Trousers (dark blue, pattern, closed below the knee)
- Sash (cobalt blue to turqoise)
- Arm bandages (dark turqoise)
- Boots (dark brown, leather, bound with light brown leather straps)
- Staff (dark brown, bright blue ribbons attached to wear on back)
- Jade-coloured necklace, bracelet, holder for end of the sash
Optional details:
- Red feather (attach to staff?)
- Health potions (red resin in glas bottles, tiny dice)
- Ball bearings / flyers to distribute on convention
- Fitting bag to carry stuff around
Recommendation 1: Buy and dye enough fabric
I made the mistake that I bought and dyed not enough fabric for both the coat and the sash. I was really lucky that when I returned to the fabric store a few weeks later, they still had some of the same fabric. Don't make the same mistake as I did: Buy enough fabric! Maybe a little bit more, just to be on the safe side.
Recommendation 2: Make a sewing pattern using old cotton fabric
For both coat and boots, I used old cotton fabric to make a sewing pattern first which I could cut out, adapt, add fabric to it again. Only after having a fitting pattern, I started with the real fabric. I would strongly recommend doing so too, because you don't want to cut your carefully dyed fabric or expensive faux leather and later realize that you made a mistake...
Recommendation 3: Start big, finish small
It is safer to cut the fabric slightly bigger than needed or to work with a bigger seam allowance. You can always trim, but attaching fabric is difficult if not impossible.
Sewing Patterns
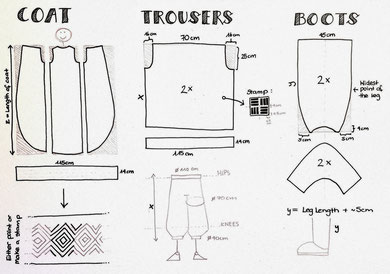
Since I'm an amateur, I normally try to use simple shapes like rectangles which I then adapt. You can see my sewing patterns in the picture on the right.
- Top: I used a top I already had and adapted it (saves time and money).
- Coat: I used three rectangle-shaped fabric parts and adapted them as seen in the picture: I cut out the part for the neck and arms. I used an additional 115x14cm piece of fabric for the kimono-style collar.
- Trousers, I also used two rectangles from which I cut out the parts where the thigh go. The additional 115x14cm piece of fabric was used for the waistband.
- Sash: A rectangular piece of fabric
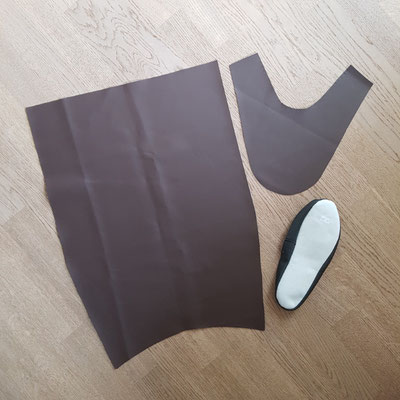
- Boots: Made with two parts of faux leather - the leg part was also an adapted rectangle, the wrist part more of a "V" shape.
- Arm bandages: 5cm-wide straps of jersey fabric
Top
As already mentioned, I just used an old jersey top with a v-neckline and adapted it. I shortened the sleeves and cut away the fabric in the belly area to match the official artwork. I used a twin needle to make the new seams.
Coat


DYEING
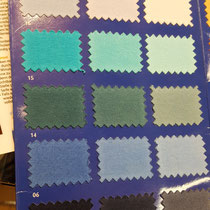
For the coat, I found a fabric (viscose) in turquoise (colour was called 'smaragd' or 'emerald' in english). I therefore had to dye the lower part of it blue. For that, I used the "Ideal" dye from "Eswacolor" (number 06; probably only in Europe). The dye worked very well, although I had to try two times: Be aware that the fabric always looks much darked when it is wet! I made this mistake, so I had to dye it again. There is a great tutorial by Ginny Di on Youtube about ombré dyeing: https://www.youtube.com/watch?v=a2dk1WRjMrk.
General note: Buy fabric with 100% natural fibers, they are dyed easier. Dyeing follows the normal colour principles: Red fabric can never be made blue or yellow for instance. In Beau's case either buy white fabric or a turquoise one like I did. Blue-ish fabric to darker blue is doable.
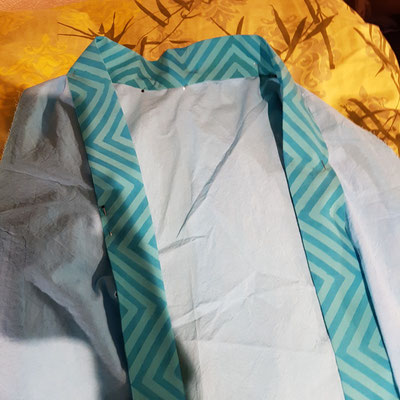
SEWING
After dyeing I cut the fabric as in the picture above. I had made a sewing pattern with old cotton fabric as explained above, so it was really satisfying to work with the dyed fabric since I knew the size was okay.
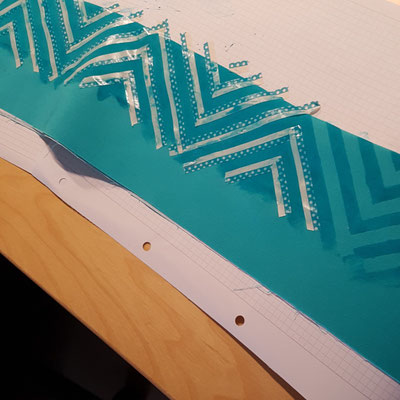
COLLAR
I sticked washi tape on the fabric to create the zigzag pattern and painted the interspace with fabric colour. While sticking the washi on, I thought that maybe it would be easier to just make a rubber stamp. The washi tape worked, but it took so long to get it right and halfway done, I used it up...
I then strengthened the fabric with a slim fusible interfacing (Bügeleinlage) twice to get it to stand nicely. I then made a bias tape with it: I folded it in the middle, ironed it, and folded the edges to the new line, ironed again. Like that, there were folds at 1/4, 1/2, 3/4 of the fabric. I used it the same way as a regular bias tape.
In case you want a lining, you have to put outer fabric and lining together before sewing on the collar's bias tape.
Near the neck, I put the coat fabric in the bias tape only 1cm, but near the end of the bias tape, I put the fabric all in until it reached the fold. Both ways is okay, but like this, it matched the original better.

Trousers
I used a fabric I already had which was thicker cotton. I made a rubber stamp with the stripe pattern of the official fanart and stamped the whole fabric with it since I'm a perfectionist and I wanted it to look as similar as possible...
To sew the trousers was quite easy: Just cut the fabric as seen in the picture above, then sewed the crotch seams first. After that, I seamed the sides of the legs. I used elastic bands for both the leg's hemlines and the waistband. Check youtube for tutorials, there are very good ones, such as the one I used: https://www.youtube.com/watch?v=FEbAwyrF1NM&t=92s. I used slimmer elastics for the legs and a 3cm elastic for the waistband.
Fabric used: 140x70cm > cut in half = 2* 70x70cm (for approx. L size) - I intentionally made the trousers a bit wider than necessary so I can move around, kick and jump in them very well without ripping seams nor fabric.

Sash
I used the same fabric I used for the coat, but I hadn't dyed enough fabric earlier, so I had to dye some more. I decided to additionally use a darker blue's dye (Ideal number 07) since I had to do it a second time anyway. I cut the fabric in the middle so I had two parts with the dark blue on one and the turquoise on the other side. I sewed the fabric pieces at the dark blue's side together and made mitered corners (--> see youtube for tutorials, e.g. https://www.youtube.com/watch?v=KYtTIOlfZSo). Because of the seam in the middle, one side of the sash is the backside and the other one the front, which I have to pay attention to when putting on, but like that, the dyeing part was easier and I didn't have to buy 360cm of fabric...
Fabric used: 140x160cm > cut in half = 2* 70x160cm > sash size approx. 65x315cm


Arm Bandages
I used dark turqoise jersey fabric because jersey doesn't fray and is elastic and therefore easier to wrap around the arms. I cut the fabric into 5cm straps and used about 4,5m for each arm. I later realized, that the bandages tend to move and especially the skin of the ellbows will eventually show. So I made additional sleeves with the same fabric and with a hole where the thumbs go. With that, the bandages stay better at one place and even if they move, the skin underneath doesn't show.
Fabric used for bandages: 30x150cm > cut in 6* 5x150cm straps > strap size 5x450cm
Fabric used for sleeves: Approx. 2* 40x30cm
Boots
I used leather soles that were meant for crocheting mokassins. I cut out two parts out of faux leather: One for the wrist area (the "V" shaped one) and one for the leg area (adapted rectangle).
I first sewed the faux leather parts on each other where the wrist is. Then I closed the sides of the boots.
Next, I tucked the faux leather on the soles and sewed it together with the machine about 1cm inward.
I then sewed the ends of the sole seam on the faux leather by hand so the transition looks nice.
I then tried the boots on and adjusted the side seams so it matched my legs better. This was mostly necessary near the wrist (however, be sure to leave enough space because your foot has to fit through). After the boots fit well and there wasn't a lot of spare leather, I cut the seam allowance back to about 0,5cm.
For the last step, I sewed the upper seam. There are different ways to do that, so best check youtube for tutorials. The way I did it was more complicated than necessary so i won't explain it here.


Staff
I used a 5cm-thick hazelnut branch from my garden. I removed the side branches and the bark right after cutting the wood, then I let it dry for several days. I then cut away any more irregular parts due to the side branches with a knife. After that, I used sand paper to make the surface even and smooth. Lastly, I painted it with a glaze to get the dark brown color (the hazelnut wood was almost white) and to protect the wood.


Jade accessories

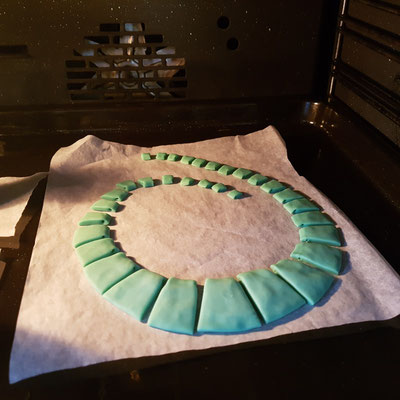
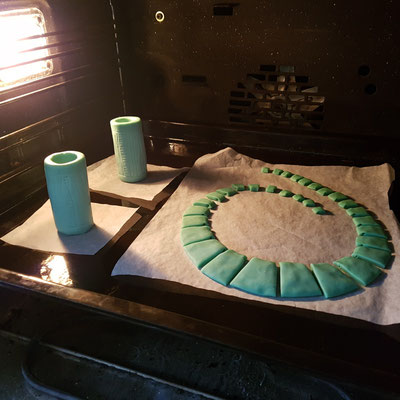
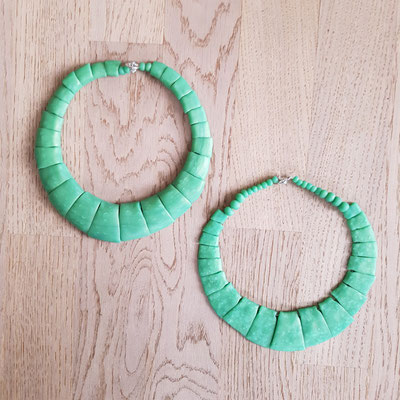

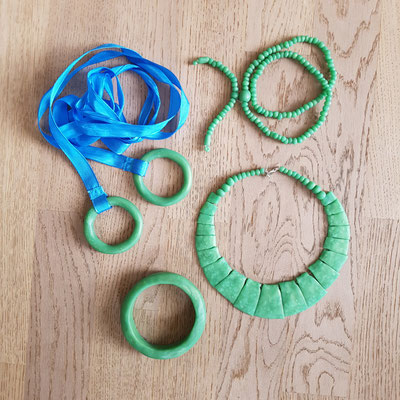
For all the jade green accessories (necklace, bracelet, rings for blue ribbon, prayer beads), I used polymer clay (FIMO effect, colour "jade green"). Normally, Fimo doesn't change colour really, however, the 'Jade green' looks awkwardly turquoise/blueish before baking and gets very green when it cools down after baking.
Necklace: I rolled out a big ball of the polymer clay and made sure it was a bit thicker in the middle. Then I patted it down so it became flatter and longer towards the middle. Only when the shape was as I wanted it, I cut it in the different pieces and put a needle / wire through the upper end so it would have a whole for the string.
After baking (110°C, 30 min.), I let it cool down in the opened oven and simply put a transparent string through the holes when it was cold. The different parts sometimes stand up a bit, so I exchanged the parts in the back with simple pellets I had made with the rest of the polymer clay.
(Edit: It still gets messed up pretty easily, so I have to work on that!)
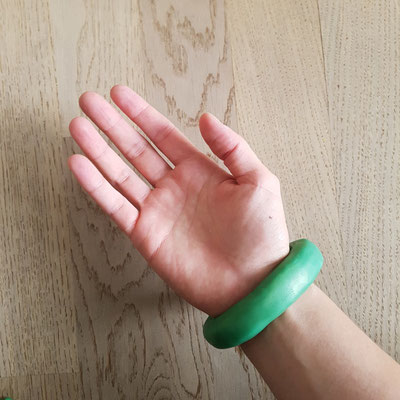
Arm bracelet: Technically very easy to make, but make sure that it fits over the hand and that the surface is smoothed out before baking. Make it thick enough so it doesn't break.
'Sash-holder things': I rolled the polymer clay out and cut it into a fitting rectangle. I put the ends together and really just tried out a lot to get it to stick together. I tried out the size I needed the hole to have with various household items like key rings etc. I then used that object to compare it with the polymer ring's hole to be sure the fabric would fit through. Right before baking, I used a toothstick to make a pattern.
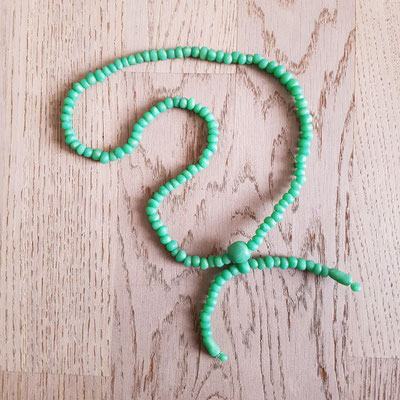
Prayer beads: In case you wanna make prayer beads too, google it. I simply used the remaining polymer clay and made small beads. I then made prayer beads modeled after the Japanese 'Juzu prayer beads'. There are a few systematic pictures online where you can see how many beads you need for it in case you want to take it accurate.
Health Potions
For the health potions, I used resin. This is a material that is liquid when working with it and hardens while in contact with air. I used the Gedeo resin which offers resin already in blue or red so I didn't need to dye it myself. The resin is a very aggressive material and damages the environment if not handled carefully. So make sure to follow the instructions given by the product, wear protection gloves, cover the work space with plastic and have paper towels as well as a small plastic waste bag ready. Like that, you can work clean, and put the used paper towels always straight in the waste bag. (You can see the stuff I used for working with the resin in the photo above). I actually used two latex rubber gloves on each hand, so when the outer gloves got really messy, I was able to change them swiftly without risking skin contact with the material.
As for the procedure, I basically followed the instructions and mixed the resin with the resin hardener, then added some glitter (optional) and mixed it very well in a used-and-cleaned yoghurt plastic cup. I then filled the phials using a small cone and always made sure the cone was not touching the glass and was clean on the outside before inserting (this prevents resin from getting from the outside of the cone to the glass in areas you don't want any resin to be). I then had to let it dry for 24 hours. I chose a sunny September day to do that, so I could leave the phials outside during the night and I strongly recommend that. In doing so, the aggressive fumes wouldn't be a problem.


